Tuesday, December 16, 2008

Beer and sunshine land farmer in hot water

Beer bottle solar-powered water heater

 Images Web 1001899
Here's a beer bottle solar-powered water heater from China -

A Chinese farmer has made his own solar-powered water heater out of beer bottles and hosepipes. Chinese farmer Ma Yanjun has made his own solar-powered water heater out of beer bottles and hosepipes /Lu Feng. "I invented this for my mother. I wanted her to shower comfortably," says Ma Yanjun, of Qiqiao village, Shaanxi province. Ma's invention features 66 beer bottles attached to a board. The bottles are connected to each other so that water flows through them.

Ananova - Beer and sunshine land farmer in hot water


Beer and sunshine land farmer in hot water

A Chinese farmer has made his own solar-powered water heater out of beer bottles and hosepipes.

"I invented this for my mother. I wanted her to shower comfortably," says Ma Yanjun, of Qiqiao village, Shaanxi province.

Ma's invention features 66 beer bottles attached to a board. The bottles are connected to each other so that water flows through them.

Sunlight heats the water as is passes slowly through the bottles before flowing into the bathroom as hot water, reports China Economy Network.

Ma says it provides enough hot water for all three members of his family to have a shower every day.

And more than 10 families in the village have already followed suit and installed their own versions of Ma's invention.


Sunday, June 15, 2008

จักรยานไฟฟ้า บริษัท อินเวนชั่น อินเตอร์เนชั่นแนล จำกัด ผลิตและจำหน่ายจักรยานไฟฟ้า คันละ 8,500 บาท ติดตั้งมอเตอร์และใช้งานได้ทันที โดยคิดค่าบริการคันละ 5,500 บาท 30 KM/Charge @ 20 KM/Hr

ตลาดสินค้าประหยัดน้ำมันมาแรง ชาวเมืองโคราชฮิตซื้อจักรยานไฟฟ้าดันยอดขายพุ่ง

โอกาสทองสินค้าประหยัดน้ำมัน ชาวโคราชแห่ใช้จักรยานไฟฟ้า ผู้บริหารบริษัท "อินเวนชั่น อินเตอร์เนชั่นแนล" เผยยอดขายทะลุเดือนละ 30 คัน ยอมรับตอนนี้รับติดตั้งและผลิตไม่ทันความต้องการของลูกค้า ล่าสุดรุกทำตลาดเครื่องสูบน้ำ เครื่องตัดหญ้า ใช้พลังงานแสงอาทิตย์

นาย ธีระพันธ์ เสยกระโทก กรรมการ ผู้จัดการ บริษัท อินเวนชั่น อินเตอร์เนชั่นแนล จำกัด ผลิตและจำหน่ายจักรยานไฟฟ้า เปิดเผย "ประชาชาติธุรกิจ" ว่า หลังจากน้ำมันมีราคาพุ่งสูงขึ้นพบว่ามีลูกค้าสนใจเข้ามาติดตั้งและซื้อ จักรยานไฟฟ้าเพิ่มมากขึ้นกว่าปกติ โดยมียอดการติดตั้งและสั่งซื้อจักรยานไฟฟ้ามากกว่าเดือนละ 30 คัน ลูกค้าส่วนใหญ่จะเป็นกลุ่มนักศึกษาในมหาวิทยาลัย แม่บ้าน คนทำงาน ผู้สูงอายุทั้งในจังหวัดนครราชสีมาและต่างจังหวัด

ปัจจุบันจักรยาน ไฟฟ้าได้รับความนิยมมากขึ้น เนื่องจากไม่ก่อมลพิษ เป็นสินค้าใหม่ที่ลดใช้น้ำมันได้เป็นอย่างดี ซึ่งคุณสมบัติพิเศษของจักรยานไฟฟ้าสามารถตากฝนได้แม้ฝนตกก็ยังสามารถใช้งาน ได้ โดยที่ไม่ก่อให้เกิดอันตรายกับผู้ใช้งาน

นอกจากนี้ยังสามารถลด ค่าใช้จ่ายในครัวเรือนได้เป็นอย่างดี คนทำงานหันมาใช้จักรยานไฟฟ้าแทนการขึ้นรถเมล์เพราะประหยัดค่าใช้จ่าย จึงอยากให้จักรยานไฟฟ้าเป็นอีกทางเลือกหนึ่งของประชาชน เป็นการออกกำลังกายเพื่อสุขภาพ เนื่องจากรถจักรยานไฟฟ้าสามารถปั่นได้ในเวลาที่แบตเตอรี่หมด

" จักรยานไฟฟ้าไม่ต้องใช้น้ำมัน สามารถวิ่งได้ระยะทาง 30 กิโลเมตรต่อการชาร์จหนึ่งครั้ง ใช้แบตเตอรี่ 24 โวลต์ 18 แอมป์ มอเตอร์ 24 โวลต์ 250 วัตต์ วงล้อจักรยาน 24 นิ้ว สามารถปั่นได้เบาสบายในกรณีไฟหมด หรืออยากปั่นออกกำลังกาย และ รถสามล้อไฟฟ้าผู้พิการ ผู้สูงอายุ วิ่งได้ระยะทาง 40 กิโลเมตร ความเร็ว 20 กิโลเมตรต่อชั่วโมง ซึ่งคนทั่วไปก็สามารถใช้งานได้"

นายธีระพันธ์กล่าวว่า ราคาจำหน่ายจักรยานไฟฟ้าคันละ 8,500 บาท สำหรับลูกค้าที่มีจักรยานอยู่แล้วก็สามารถนำมา ติดตั้งมอเตอร์และใช้งานได้ทันที โดยคิดค่าบริการคันละ 5,500 บาท สำหรับลูกค้าที่อยู่ต่างจังหวัดส่วนใหญ่บริษัทจะจัดส่งอุปกรณ์พร้อมคู่มือ การติดตั้งอย่างง่ายไปทาง ไปรษณีย์ รับประกันการใช้งาน 1 ปี ซึ่งขณะนี้บริษัทรับติดตั้งและผลิตสินค้าได้ไม่ทันกับความต้องการของลูกค้า ที่เพิ่มจำนวนขึ้น

นอกจากนี้เมื่อ 3 เดือนที่ผ่านมาบริษัทได้ออกผลิตภัณฑ์ใหม่ที่เรียกว่า โซลาร์ปั๊ม ซึ่งเป็นเครื่องสูบน้ำ และเครื่องรดน้ำต้นไม้ขนาด 0.5 แรงม้า โดยใช้พลังงานไฟฟ้า จากแสงอาทิตย์แปลงเก็บไว้ในมอเตอร์ สามารถใช้งานได้ตลอดทั้งวัน จำหน่าย ชุดละ 25,000 บาท รวมค่าติดตั้งทั้งหมด รับประกันแผงโซลาร์ 25 ปี และอุปกรณ์ อื่นอีก 1 ปี นอกจากนี้ยังมีเครื่องตัดหญ้าพลังแบตเตอรี่ และเครื่องพ่นยาพลังแบตเตอรี่จำหน่ายด้วย ถือเป็นอีกทางเลือกหนึ่งที่ไม่ต้องใช้ไฟฟ้า

Tuesday, June 3, 2008

เตาเผาถ่านโดยใช้ถังน้ำมัน 200 ลิตร นำเศษวัสดุเหลือใช้มาทำเป็นถ่านได้ผลผลิตที่มากกว่าปกติ ผลิตถ่านดูดกลิ่น น้ำส้มควันไม้

พลังงานทางเลือก

พิชิต วนิชพันธุ์ มหาวิทยาลัยราชภัฏธนบุรี

เยี่ยมบ้านคอทราย ดูพลังงานชุมชนลดค่าใช้จ่าย

ใน ปัจจุบันประเทศไทยกำลังประสบกับปัญหาราคาพลังงาน ซึ่งมีราคาสูงขึ้น ไม่ว่าจะเป็นน้ำมัน ถ่านหิน หรือก๊าซธรรมชาติ ที่ผ่านมาแม้จะมีการรณรงค์ให้ประชาชนตระหนักต่อสถานการณ์ด้านพลังงานและใช้ พลังงานอย่างมีประสิทธิภาพ แต่พบว่าในหลายๆ พื้นที่นั้นยังไม่ยอมปรับปรุงพฤติกรรมการใช้พลังงาน ทั้งนี้ อาจเพราะส่วนใหญ่นั้นคิดว่าเป็นเรื่องไกลตัว หรืออาจจะขาดความรู้และไม่มีการรวมกลุ่มจัดการพลังงาน ที่จะสามารถลงมือปฏิบัติได้จริง

จากข้างต้นนั้น ทางกระทรวงพลังงาน จึงจัดทำโครงการแผนพลังงานชุมชนขึ้น โดยมีรูปแบบการทำงานร่วมมือกับภาคประชาสังคมในการมุ่งส่งเสริมทัศนคติเรื่อง การใช้พลังงานอย่างยั่งยืน โดยให้ประชาชนเป็นศูนย์กลางเพื่อให้เกิดการมีส่วนร่วม ผ่านกระบวนการวางแผนพลังงานระดับชุมชน เพื่อส่งเสริมการจัดการทรัพยากรที่มีอยู่ในพื้นที่และวัสดุเหลือใช้ มาเป็นพลังงานทดแทน ภายใต้สโลแกน "ชีวิตพอเพียง เพื่อพลังงานเพียงพอ"

สำหรับ แผนพลังงานชุมชนนั้น มีวัตถุประสงค์หลักคือ สร้างแผนพลังงานระดับตำบลเพื่อสร้างขีดความสามารถให้องค์การบริหารส่วนตำบล มีศักยภาพในการทำแผนงานได้อย่างเป็นรูปธรรม โดยจะสร้างความเข้าใจร่วมกันและสร้างทีมคณะทำงานชุมชนจัดเก็บข้อมูลพลังงาน ในพื้นที่ ประมวลผลสถานภาพพลังงาน และนำข้อมูลที่ได้มาบอกกับชุมชน ประชุมระดมความคิดเห็นเพื่อจัดทำร่างแผนพลังงาน แล้วจึงปฏิบัติตามแผนที่วางไว้

เมื่อปลายเดือนที่ผ่านมา ทางกระทรวงพลังงานได้จัดงานพาไปเยี่ยมชมโครงการจัดทำแผนพลังงานชุมชนที่ ประสบความสำเร็จ โดยได้รับรางวัลรองชนะเลิศจากการประกวดของโครงการ คือชุมชนบ้านคอทราย อำเภอค่ายบางระจัน จังหวัดสิงห์บุรี โดยเมื่อเดินทางไปถึง ทางด้าน อบต.คอทราย ก็ให้การต้อนรับ คณะทำงานพลังงานชุมชนรายงานผลการดำเนินงานและกิจกรรมการวางแผนพลังงานชุมชน

โดย ทางกระทรวงพลังงานร่วมกับทางด้านองค์การบริหารส่วนตำบลคอทราย อำเภอบางระจัน จังหวัดสิงห์บุรี ได้จัดกิจกรรมวางแผนท้องถิ่นขึ้นเป็นเวลา 7 เดือน คือระหว่างเดือนมีนาคม 2550-กันยายน 2550 เพื่อพัฒนาศักยภาพ องค์การบริหารส่วนตำบลและชุมชนในการทำแผนพลังงาน และริเริ่มกิจกรรม วางแผนพลังงานหมุนเวียนมาใช้ในชุมชน ด้วยการร่วมมือของหลายฝ่าย อาทิ สมาชิกสภา คณะผู้บริหาร เจ้าหน้าที่องค์การบริหารส่วนตำบล กำนัน ผู้ใหญ่บ้าน กลุ่มสตรี เยาวชน ตลอดจนหน่วยงานที่เกี่ยวข้องทั้งในและนอกชุมชน

เหตุสำคัญด้านพลังงาน ของชุมชนคอทรายนั้น มาจากความไม่รู้ทั้งที่มีวัสดุที่สามารถแปลงเป็นพลังงานทดแทนได้ เมื่อไม่รู้ก็ทำให้เสียโอกาส สูญเสียค่าใช้จ่ายไปโดยไม่รู้ตัว ซึ่งจากการรวบรวมข้อมูลของโครงการที่ปรึกษา แสดงให้เห็นว่าชุมชนตำบลคอทรายนั้นบริโภคพลังงาน มีมูลค่ารวมทั้งสิ้น 11,724,223 บาท

เพื่อแก้ไขสถานการณ์นี้ ทางด้านองค์การบริหารส่วนตำบลและประชาชนในชุมชนได้ผลสรุปจากการจัดเวที ประชาคมในรูปแผนพลังงานชุมชน คือโครงการส่งเสริมการใช้เตาหุงต้มประสิทธิภาพสูง (เตาอั้งโล่ในครัวเรือน) และโครงการเตาเผาถ่าน ขนาด 200 ลิตร เพื่อใช้ทรัพยากรธรรมชาติที่มีอยู่ในท้องถิ่นอย่างคุ้มค่าควบคู่กับการใช้ เตาหุงต้มประสิทธิภาพสูง

หลังจากที่ชุมชนตำบลคอทรายดำเนินการตาม โครงการที่วางไว้ ส่งผลให้ประชากรในตำบลคอทรายมีการปรับเปลี่ยนพฤติกรรมการบริโภคพลังงานโดย การนำเตาหุงต้มประสิทธิภาพสูงไปใช้ในครัวเรือน 231 เตา มีการสร้างเตาเผาถัง 200 ลิตร จำนวน 85 เตา สามารถผลิตถ่านคุณภาพสำหรับใช้ในครัวเรือน ได้ประมาณ 81,600 กิโลกรัม ต่อปี ทำให้ลดการใช้ก๊าซหุงต้มในชุมชน

หลังจากที่ฟังการรายงานของทาง คณะทำงานพลังงานชุมชนเรียบร้อย ก็พาไปเยี่ยมชมพื้นที่ศูนย์การเรียนรู้ด้านการผลิตพลังงาน ได้แก่ บ้านคุณสมชาย ปานทอง ซึ่งตั้งอยู่เลขที่ 42 หมู่ที่ 1 ตำบลคอทราย อำเภอบางระจัน จังหวัดสิงห์บุรี 16150 เพื่อไปดูเตาเผาถ่านจากถัง 200 ลิตร โดยคุณสมชายนั้นถือเป็นชาวบ้านคนแรกของชุมชนที่นำเตาเผาถ่านถัง 200 ลิตร มาใช้ หลังจากได้ไปดูงานกับทางกระทรวงพลังงาน

โดยเตาเผาถ่าน 200 ลิตร ของคุณสมชายนั้นจะมีความแตกต่างจากที่อื่นคือ จะเป็นแบบวางนอนแล้วนำดินมาโบกปิดไว้ จะนิยมใช้ดินที่มีความเหนียว และจะใช้ตะแกรงเหล็กหรือลวดนำมาวางแล้วจึงนำดินมาโบกรอบเตาเพื่อให้เป็นโครง สร้างที่แข็งแรง หากถัง 200 ลิตร พังก็แค่นำใบใหม่มาเปลี่ยนใส่แทน

สำหรับ วิธีการสร้างเตาเผาถ่านโดยใช้ถังน้ำมัน 200 ลิตร นั้นต้องเลือกสถานที่ในการสร้างเตา โดยควรเป็นที่ดอน ควรอยู่ห่างจากบ้านเรือนอย่างน้อย 50 เมตร อยู่ใกล้แหล่งไม้ฟืน หรือวัตถุดิบ โดยจะใช้วัสดุ/ส่วนประกอบ คือ

1. ถังน้ำมัน 200 ลิตร 1 ถัง

2. 2. ท่อใยหิน เส้นผ่านศูนย์กลาง 4 นิ้ว ยาว 1-1.5 เมตร 1 ท่อ

3. 3. ข้องอใยหิน เส้นผ่านศูนย์กลาง 4 นิ้ว

4. 4. อิฐบล็อค 4 ก้อน

5. 5. ดินเหนียว

6. 6. ขี้เถ้าแกลบ (แกลบดำ)

7. ดินหรือทราย (ทำฉนวนหุ้มเตา)

8. 8. ไม้ไผ่ เส้นผ่านศูนย์กลางอย่างน้อย 3 นิ้ว เจาะทะลุปล้อง ความยาวอย่างน้อย 5 เมตร

9. 9. ภาชนะใส่น้ำส้มควันไม้ ควรเป็นถังพลาสติคทรงสูง เพราะน้ำส้มควันไม้เป็นกรด ถ้าหากใช้ภาชนะรองเป็นโลหะ กรดจะกัดโลหะทำให้น้ำส้มควันไม้คุณภาพไม่ดี

10. 10. สายยาง

หลัง จากที่เตรียมวัสดุเสร็จแล้วก็จะมาถึงขั้นตอนการประกอบเตา โดยการนำถังน้ำมัน 200 ลิตร ตัดฝาด้านใดด้านหนึ่งออก ให้สามารถเปิด-ปิด ได้ นำฝาที่ตัดออกเจาะเป็นรูสี่เหลี่ยม 20x20 เซนติเมตร ส่วนฝาอีกด้านหนึ่งไม่ต้องตัดออก แต่ให้เจาะรูกลม เส้นผ่านศูนย์กลาง 4 นิ้ว ปูพื้นด้วยทราย ให้มีขนาดความกว้าง-ยาว เท่ากับถังน้ำมัน 200 ลิตร และนำถังน้ำมันไปวางไว้ ประกอบข้องอและท่อใยหิน ซึ่งทำหน้าที่เป็นปล่องควัน ต่อเข้ากับเตาที่ได้ เจาะรูขนาด 4 นิ้ว พร้อมกับประสานรอยต่อโดยใช้ดินเหนียวผสมกับขี้เถ้าแกลบ

นำดินเหนียว ไปหุ้มเตาทั้ง 3 ด้าน คือด้านข้าง 2 ด้าน และด้านบน ความหนาประมาณ 30 เซนติเมตร จะทำให้เก็บความร้อนภายในเตาได้ดีขึ้น (เป็นฉนวน) ใช้เหล็กเส้นความยาวประมาณ 1 ฟุต 2 อัน วางไว้ภายในเตาในแนวขวาง หัว-ท้าย เพื่อให้ความร้อนหมุนเวียนได้ดีขึ้น นำไม้ฟืน ตัดให้มีความยาว 80 เซนติเมตร (ถังน้ำมัน 200 ลิตร ยาว 90 เซนติเมตร) วางไปตามความยาวของเตาจนเต็ม ไม้ที่นำไปเผาไม่ควรสด-แห้ง จนเกินไป ปิดฝาถัง จากนั้นนำอิฐบล็อคมาวางไว้ด้านหน้าเตา บริเวณช่องที่เจาะไว้ และประสานรอยต่อโดยใช้ดินเหนียวกับขี้เถ้าแกลบ

หลังจากนั้น ก็จุดไฟบริเวณหน้าเตา โดยค่อยๆ ใส่เชื้อเพลิง ความร้อนจะกระจายเข้าสู่ตัว

เตา เพื่อไล่อากาศเย็นและความชื้นที่อยู่ในเตา ในระยะแรกควันจะมีกลิ่นเหม็น ซึ่งเป็นกลิ่นกรดที่อยู่ในไม้ ค่อยๆ ใส่เชื้อเพลิงเข้าไปเรื่อยๆ ควันสีขาวตรงปล่องควันจะเพิ่มขึ้นเรื่อยๆ เมื่อเผาไปอีกระยะหนึ่ง ควันสีขาวจะเริ่มบางลงและเปลี่ยนเป็นสีเทา ช่วงนี้จะต้องลดเชื้อเพลิงลง เนื่องจากเป็นช่วงที่สารที่อยู่ในเนื้อไม้ถูกขับออกมา สังเกตโดยบริเวณปากปล่องควัน จะมีสารสีดำที่เรียกว่ายางไม้ หรือ Tar ติดอยู่ จากนั้นควันจะเปลี่ยนจากสีเทาเป็นสีน้ำเงิน ขั้นตอนต่อไปจะต้องให้ความสำคัญเป็นพิเศษ ซึ่งเป็นช่วงที่ไม้จะเปลี่ยนเป็นถ่าน ให้เฝ้าสังเกตดูควันที่ปล่องควันจะเปลี่ยนจากสีน้ำเงินเป็นสีฟ้า แสดงว่าฟืนภายในเตาเริ่มจะกลายเป็นถ่าน จากนั้นควันสีฟ้าจะอ่อนลง ยางไม้ที่เกาะอยู่บริเวณปล่องควันด้านในจะแห้ง อุณหภูมิภายในเตาจะสูงมาก ประมาณ 500 องศาเซลเซียส ในที่สุดควันสีฟ้าก็จะหมดไป และเปลี่ยนเป็นควันใส ซึ่งแสดงว่าไม้ที่อยู่ในเตาได้กลายเป็นถ่านไปหมดแล้ว ให้เริ่มปิดหน้าเตาก่อน โดยใช้ดินเหนียวปิดรอยรั่ว รอยต่อ จากนั้นทิ้งไว้ประมาณ 1 ชั่วโมง ก็ปิดปล่องควันให้สนิท ก็ถือเป็นอันเสร็จสิ้นขั้นตอนการเผาถ่าน จากนั้นทิ้งไว้หนึ่งคืน หรือประมาณ 10 ชั่วโมง เป็นอย่างน้อย เพื่อให้ถ่านดับสนิท แล้วจึงเปิดเตาเพื่อเอาถ่านออก วางเรียงในที่โล่งแจ้งก่อนประมาณ 1 ชั่วโมง เพื่อป้องกันไม่ให้ถ่านกลับติดลุกเป็นไฟ แล้วจึงบรรจุใส่ภาชนะหรือกระสอบ

สำหรับ การทำงานของเตาเผาถ่านถัง 200 ลิตรนี้ จะไม่เหมือนการเผาถ่านแบบทั่วไป เพราะจะเป็นการจุดไฟจากด้านนอกเพื่อให้ความร้อนนั้นเข้าไปไล่ความชื้นใน เนื้อไม้จนกลายเป็นถ่าน จึงทำให้ได้ผลผลิตที่มากกว่าปกติ เนื่องจากปกตินั้นไม้ที่จะนำไปใช้เผานั้นต้องมีขนาดใหญ่ เมื่อเผาออกมาก็จะได้ถ่านแค่ส่วนหนึ่ง ส่วนอื่นก็จะเสียไป แต่เตาชนิดนี้สามารถใช้ไม้ทั้งชิ้น และยังสามารถนำเศษวัสดุเหลือใช้มาทำเป็นถ่านได้ เช่น เปลือกทุเรียน ฝักบัว กาบมะพร้าว กาบตาล เป็นต้น จึงทำให้เกิด การผลิตถ่านดูดกลิ่นขึ้นมา โดยจะใช้เปลือกหรือผลของผลไม้ที่มีอยู่ในพื้นที่มาเผาทำถ่าน เพื่อดูดกลิ่น เนื่องจากถ่านผลไม้นั้นจะสามารถดูดกลิ่นได้ดีกว่าถ่านที่ทำมาจากไม้ทั่วไป ถ่านผลไม้นี้ได้รับการยอมรับและสนับสนุนให้เป็นสินค้าโอท็อป สร้างรายได้ให้กับชุมชนอีกทางหนึ่ง

นอกจากเผาถ่านแล้ว เตาถัง 200 ลิตร นี้ยังสามารถที่จะอบแห้งสมุนไพรได้อีกด้วย โดย คุณยุ้ย ปานทอง แพทย์แผนไทย หมอโบราณ บิดาของคุณสมชายนั้นจะอบแห้งส่งทางโรงพยาบาลสิงห์บุรี โดยจากเดิมต้องใช้ตู้อบทั้งหมด แต่ปัจจุบันจะใช้เตาถัง 200 ลิตร โดยนำถาดใส่สมุนไพรมาวางไว้บนเตา เพื่อให้ได้รับความร้อนจนสมุนไพรนั้นแห้งเหมือนใช้ตู้อบ ถือเป็นการช่วยลดการใช้พลังงานอย่างหนึ่ง

นอกจากข้อดีต่างๆ ที่กล่าวไปแล้ว เตาเผาถ่านถัง 200 ลิตร นั้น ยังมีผลผลิตที่ถือเป็นผลพลอยได้จากการเผาถ่าน จะมาจากควันที่เกิดจากการเผาถ่านในช่วงที่ไม้กำลังเปลี่ยนเป็นถ่าน เมื่อทำให้เย็นลงจนควบแน่นแล้วกลั่นตัวเป็นหยดน้ำ ของเหลวที่ได้นี้เรียกว่า น้ำส้มควันไม้ มีกลิ่นไหม้ ส่วนประกอบส่วนใหญ่เป็นกรดอะซิติก มีความเป็นกรดต่ำ มีสีน้ำตาลแกมแดง

น้ำ ส้มควันไม้ มีสารประกอบต่างๆ มากมาย เมื่อนำไปใช้ประโยชน์ทางการเกษตรจะมีคุณสมบัติ เช่น เป็นสารปรับปรุงดิน สารป้องกันกำจัดศัตรูพืช และสารเร่งการเติบโตของพืช นอกจากนี้ มีการนำน้ำส้มควันไม้ไปใช้ประโยชน์ในอุตสาหกรรม เช่น ใช้ผลิตสารดับกลิ่นตัว ผลิตสารปรับผิวนุ่ม ใช้ผลิตยารักษาโรคผิวหนัง เป็นต้น

สำหรับการเก็บน้ำส้มควันไม้นั้นก็จะนำไม้ไผ่ที่เตรียมไว้ ให้ส่วนโคนอยู่เหนือปล่องควัน 20เซนติเมตร ส่วนปลายให้ชี้ขึ้นทำมุม 45 องศา โดยนำวัสดุยึดไว้เจาะรูด้านล่างของไม้ไผ่ ขนาด 1 เซนติเมตร บริเวณโคนของไม้ไผ่ นำปลายสายยางด้านหนึ่งไปสวมไว้ที่รูไม้ไผ่ อีกด้านหนึ่งหย่อนลงในถังพลาสติค ควันที่ออกจากปล่องจะเป็นไอร้อน เมื่อกระทบกับอากาศในลำไม้ไผ่จะเกิดการควบแน่นกลายเป็นหยดน้ำ แล้วจะไหลย้อนกลับลงมาผ่านรูที่เจาะ ผ่านสายยางลงสู่ถังพลาสติค แนะนำให้เก็บในช่วงอุณหภูมิปากปล่องควันประมาณ 80-85 องศาเซลเซียส ช่วงอุณหภูมิภายในเตาจะประมาณ 300-400 องศาเซลเซียส ถ้าเก็บในอุณหภูมิต่ำกว่า 300 องศาเซลเซียส จะได้สารประกอบที่มีประโยชน์น้อยมาก และถ้าเก็บควันในช่วงที่อุณหภูมิเกิน 425 องศาเซลเซียส น้ำมันดินหรือน้ำมันทาร์ (Tar) จะสลายตัวเป็นสารก่อมะเร็ง

สำหรับน้ำส้มที่ได้มานั้นยังไม่สามารถ ใช้ประโยชน์ได้ทันที เพราะจะไปปิดปากใบของพืชและเกาะติดรากพืช ทำให้พืชโตช้าหรือตายได้ ดังนั้น จึงต้องทำให้บริสุทธิ์เสียก่อน ซึ่งทำได้ 3 วิธี คือ การปล่อยให้ตกตะกอน โดยนำน้ำส้มควันไม้มาเก็บในถังทรงสูง มีความสูงมากกว่าความกว้างประมาณ 3 เท่า โดยทิ้งให้ตกตะกอนประมาณ 90 วัน น้ำส้มควันไม้จะตกตะกอนแบ่งเป็น 3 ชั้น ชั้นบนสุดจะเป็นน้ำมันใส (Light Oil) ชั้นกลางเป็นของเหลวสีชา (Wood Vinegar) และชั้นล่างสุดจะเป็นของเหลวสีข้นดำ คือ น้ำมันดิน (Tar) ผงถ่านผสมน้ำมันดิน สามารถนำไปโรยรอบอาคาร เพื่อป้องกันสัตว์ต่างๆ เช่น มด ปลวก ตะขาบ ฯลฯ และจะสลายตัวได้เองภายในเวลาไม่นานนัก แต่ห้ามทิ้งลงแหล่งน้ำเด็ดขาด

หลังจากตกตะกอนจนครบกำหนดแล้ว นำน้ำส้มควันไม้มากรองซ้ำอีกครั้งด้วยผ้ากรอง แล้วนำไปใช้ประโยชน์ได้ น้ำส้มควันไม้ที่บริสุทธิ์ ต้องมีน้ำมันดินไม่เกิน 1% ซึ่งสามารถตรวจสอบได้ง่าย โดยดูความใส หากมีน้ำมันดินเกิน 1% น้ำส้มควันไม้จะขุ่นและมีสีดำ น้ำส้มควันไม้ที่ดีจะมีลักษณะใสสีชา หรือน้ำตาลแดง แตกต่างกันไปตามชนิดของไม้ ซึ่งหากได้จำนวนมากอาจนำไปจำหน่าย ถือเป็นรายได้เสริมอีกทาง

นอกจาก เตาเผาถ่านถัง 200 ลิตร แล้ว ทางหมู่บ้านคอทรายนั้นก็ยังมีอุปกรณ์ที่ช่วยลดการใช้พลังงานอีกชนิดคือ เตาซุปเปอร์อั้งโล่ ซึ่งเตาชนิดนี้จะมีความแตกต่างจากเตาที่ใช้ทั่วไปตามบ้านเรือน คือ จะมีช่องที่ใส่ถ่านเป็นทรงลึก และปากเตาเล็กจึงจะมีอากาศผ่านเข้าได้น้อย สามารถใช้ถ่านได้คุ้มค่า และยังมีฝาปิดหน้าเตาเพื่อที่สามารถควบคุมความแรงของไฟได้ เมื่อนำมาใช้กับถ่านที่เผาจากเตาถัง 200 ลิตร ก็ยิ่งมีประสิทธิภาพสูงขึ้น โดยคุณสมชายกล่าวว่า หลังจากที่มีอุปกรณ์ 2 สิ่งนี้ ทำให้เขานั้นสามารถลดการใช้ก๊าซหุงต้ม จากปกติ 3 เดือน 1 ถัง เป็น 9 เดือน ต่อ 1 ถัง เลยทีเดียว

จากที่ได้เยี่ยมชมบ้านคอทรายนั้น ทำให้เห็นถึงความคิดสร้างสรรค์และการร่วมมือกันของชุมชนนี้ ซึ่งหากทางด้านชุมชนอื่นๆ ทั่วประเทศ โดยเฉพาะกรุงเทพฯ นั้น ให้ความร่วมมือกับสิ่งที่เป็นประโยชน์ต่อสังคมของเราเหมือนกับประชากรใน ชุมชนบ้านคอทรายแล้วละก็ ประเทศไทยนั้นคงสามารถแก้ปัญหาด้านพลังงานหรือแม้กระทั่งปัญหาอื่นๆ ได้ไม่ยาก

Monday, April 28, 2008

How to Cook with the Sun [DIY]

Web site Ecobites details how to cook with the power of the sun with your own DIY solar cooker. In a nutshell, the author rounded up a bit of plywood and aluminum foil to create a reflective parabolic surface capable of focusing the heat of the sun to the cooking surface—another great idea to add to the list of unconventional heat/fire-starting methods.

Saturday, April 26, 2008

solar-powered pumps and motors DIY

solar-powered pumps and motors DIY
Link
http://www.suburbia.com.au/~mickgg/minimax/minimax.htm

There are three choices:
(i) Build Version Oneon this page. (small and awkward circuit board)
(ii) Build Version Two or Version Three (easier construction using
Veroboard-style circuit board).
(iii) Buy the kitfrom the ATA (Melbourne, Australia)


Build this simple Mini Maximiser

Greatly improve the performance
of solar-powered pumps and motors
by building this
simple mini-maximiser.

by Alan Hutchinson, Plasmatronics, Melbourne (this Web version with
his permission)

One of the more common uses of solar electric (photovoltaic) panels is
driving motors and in particular for water pumping.

The motor is connected directly to the solar panels and no storage
battery is used. This arrangement works well but suffers from one
major weakness. Because solar panels are effectively constant current
sources they cannot deliver extra power for starting like a battery
can. In fact, due to the low resistance of motors when stopped, the
panels can only deliver a small fraction of their no
rmal power during start up. This means that there is very little power
available at the time it is most needed to get the motor running.
Fortunately, this problem can be easily solved by using an electronic
device to match the panel to the motor so as to allow the panel to
deliver its full power into the motor even when the motor is stalled.
A variety of such devices are available on the market such the
"Maximiser" and various forms of maximum power point trackers. These
are quite sophisticated devices costing some hundreds of dollars. This
is OK for a large pump setup but for a small one or two panel system
it is a bit expensive. Here is a simple mini- maximiser that you can
build yourself and will perform almost as well as some of the more
expensive ones.


How it works


First let's take a closer look at the problem. The motor driven
diaphram pump used here for testing the maximiser is a 12V motor
nominally rated at 6amp. The pump would not start even when unloaded
when driven from a sing
le 50W panel (an Arco M55). With 3.3Amp from the panel flowing through
the motor, 1.2 volt was measured across the motor. Hence the power
going into the motor is only 1.2 x 3.3 = 4 Watt. If the panel was
being operated at its peak power point (about 17.5V), it could have
delivered 55W rather than the paltry 4W it actually delivered.


So the problem is that we need to get the panel to supply its energy
at 17V but somehow we need to deliver it to the motor at a lower
voltage. More expensive maximisers use switchmode down converters to
perform this function of acting like a DC transformer. This maximiser
is much simpler.


The circuit diagram shows that it is basically a large capacitor
across the panel which can be connected by an electronic switch to the
motor. When the switch is off, the capacitor will be charged up by the
panel. As the open circuit voltage of the panel is usually above 20V,
the capacitor can charge to quite a high voltage. When the capacitor
voltage rises above an adjustable s
et point (in the range 10.5-17 volts) the electronic switch (the FET)
turns on. This connects the motor across the capacitor and will draw a
lot of current from the capacitor into the motor. This will cause the
capacitor to discharge rapidly. When the capacitor voltage falls about
half a volt below the set point, the FET will switch off again and
allow the capacitor to charge up again. This cycle then repeats
indefinitely. It is basically a free running oscillator with the rate
of charge determined by the panel charge current and the rate of
discharge determined by the amount by which the motor current exceeds
the panel current. Yes, it is possible to get more current flowing
into the motor than is coming out of the panel!)


So what have we got happening? The panel is delivering a steady 3 amp
at close to the set point voltage. If the set point is set close to
the maximum power point of the panel, the panel will be delivering as
much power as it can. On the motor side, the motor will be driven with
pu
lses of high current which is excellent for providing the high torque
necessary to get it moving. When its stalled, the pulses will be large
but of short duration. As the motor picks up speed, the voltage across
it will rise due to the back EMF and the pulses will be at a lower
current but of longer duration. This means that the frequency of the
oscillator will fall as the motor gets going. In this example, the
frequency when running was about 1Khz and the switch was off for about
1/3 of the time.


What it did


The improvement in performance due to the maximiser was amazing.
Without it, the pump motor would not even run unloaded, even if it was
turned over by hand. With the maximiser, it started up and ran well.
With the set point voltage at 13V, the panel current measured 3.2A
(input power 41W) and we had it pumping water up 6 metres.


Circuit details


The two large electrolytic capacitors are charged by the solar panel
and then quickly discharged into the load by the
FET switch.


A BUK455-60A is used. for the electronic switch. This will block 50V
and has an on resistance of 0.03 Ohm. Because of the low on resistance
it is not necessary to provide a heat sink. The SF52 is a very fast
recovery diode (normal diodes are not good enough) that is used as a
catch or freewheeling diode. This provides a path for the motor
current to flow through when the switch is off. This protects the FET
from high voltage spikes when it switches off.

circuit
http://www.suburbia.com.au/~mickgg/minimax/schemati.gif
An LM311 comparator is used to compare the working capacitor voltage
(reduced by the adjustable voltage divider) with a reference voltage
supplied by the 6.2 volt zener diode. The output of the LM311 drives
the FET switch. The 100K resistor supplies positive feedback round the
LM311 and creates about 0.5V of hysteresis between the switch on and
switch off voltages. The 100pF cap. speeds the switching and
suppresses transition oscillations. (The speed of the maximiser's
oscillations could be doubled by increasing the 100K resisto
r to 220K) If a 24V version is required, the extra three components
shown should be inserted to limit the LM311 supply to 15V, and the top
3K3 divider resistor should be replaced with a 12K (one of the 470 Ohm
resistors replaces D1) About 2.5W is wasted in the operation of the
maximiser.


Construction
http://www.suburbia.com.au/~mickgg/minimax/cct-up.gif
http://www.suburbia.com.au/~mickgg/minimax/cct-dn.gif

This is not a difficult device to make. It takes about 1 hour to put
together. To make it easier, the circuit is constructed on a piece of
predrilled circuit board supplied in the kit. The components are
mounted on the opposite side from the copper tracks according to the
layout diagram. Take care to get all the diodes,the LM311, the FET,
and the large capacitors round the right way. Solder the components
on, taking care not to create bridges between tracks.

Note: view in 800 x 600 screen mode to see these images side-by-side.
To print the whole image of copper tracks, click on it, and print the
image "cct-dn.gif" on a separate page.


Bend the wires from the large capacito
rs and the FET along the copper tracks to reinforce the tracks if two
panels are to be used.


When assembly is finished, clean off the flux and check that each
component is in the correct place, that it is the right way round and
that there are no bridges between tracks.


Testing


Connect a 12V battery to the solar terminals with a 220 Ohm resistor
between the battery+ and the solar+ terminals. The resistor is to
limit the current in case something is wrong) Don't connect anything
to the motor terminals.


Measure the voltage across the 220 Ohm resistor with a multimeter. If
everything is OK, then it should be roughly 2.2V. If this is OK,
remove the 220 Ohm resistor and connect battery+ direct to sol+. Now
check the voltage across the 6.2V zener diode (Z1). This should be
roughly 6.2 volts. Set the trimpot to its mid point and measure the
voltage between the trimpot centre leg and the sol- terminal. This
should be about 6V. Turn the pot fully anticlockwise, then measure the
voltage across the 15V zener diode (Z2). It should be about 11V
indicating that the switch to the motor is turned on. Turn the pot
fully clockwise. The voltage across the zener should now be less than
lV indicating that the switch is off. If you can get it to perform
like this, then try it on the real thing.


Parts List (Kit version only)

1

Power FET BUK455 60A

FET1

1

SF52 superfast diode

D2

1

LM311N comparator IC

IC1

1

6.2V 400mW zener diode

Z1

1

15V 400mW (or 1W) zener diode)

Z2

1

1N4148 diode

D1

3

3K3 1/4W metal film resistors

R1,R2,R3

1

1K5 1/4W metal film resistor

R4

1

100K 1/4W metal film resistor

R5

1

2K horizontal trimpot

TP1

1

0.1 uF monolithic ceramic capacitor 50V

C2

1

100 pF ceramic capacitor 50V

C1

1

4way PCB mount terminal block

CONN1

2

470 uF 50V RB electrolytic capacitors

C3,C4

1

MAXI Circuit board

(for a 24V version these extra c
omponents are required)

1

15V 1W zener diode

Z3

2

470R 1W resistors

R6 & replace D1

1

12K 1/4W resistor

R2 (alternate value)


Operation


Connect the solar panel(s) to the solar+ and solar- terminals. Connect
the motor to the motor- and motor+ terminals. When the motor is
stalled, you may hear a high pitched whine as the maximiser is pouring
maximum current into the motor to try and get it moving. As the motor
speeds up, the pitch of the whine drops. You can also hear it change
pitch as the amount of light falling on the panel changes.


The reason for the adjustment pot is to allow the operating point of
the panel to be varied according to the situation. If you are trying
to get pumping under overcast conditions or in the morning or evening,
then the operating point needs to be low enough so that the peak panel
voltage is high enough to charge the capacitor up to the switch
threshold. In other words, if the operating point is set too high, the
panel voltage can
never get above it and the maximiser won't oscillate. In the test
situation described above, we found that with the operating point set
at about 13V the pump would start with about 14W of input power (ie
about 1/4 of full output). A setting in the range of 12-14 volt seems
to be appropriate. If there is sufficient power from the panel to
bring the motor voltage up above the set operating point then the
switch will simply remain on. (ie if there is enough power the
maximiser will retire gracefully until its services are needed again.)


If you put the circuit in a box then be careful to allow holes for
adequate ventilation especially with 2 panels. This simple circuit
extends the operating range of motors and pumps run directly off solar
panels in a cheap but effective way.


Our unit worked first time and if you are careful with the
construction, there is no reason why yours shouldn't either.

This text is from the kit form of the Mini Maximiser

Voltscommissar Home Page
http://www.voltscommissar.net/

DIY energy project solar hot water project

DIY energy project solar hot water project

http://www.voltscommissar.net/index.html

DIY Baseload Renewable Energy Project (a do-it-yourself solar hot
water project) A solar water heater on every Australian home within
the decade, would be eight million units, saving about 32 million
tonnes CO2 annually, compared to present day coal or gas powered water
heating. Over time, it is as cheap as present-day off-peak
electricity, and would be equal to three 1000MW nuclear power
stations, but much cheaper, and without any radioactive waste.
Politicians continue to LIE REPEATEDLY when they assert "Australia
must go nuclear, because there is no cost effective baseload renewable
technology yet." Get your plumber to put this system on your roof, and
prove what liars they are!


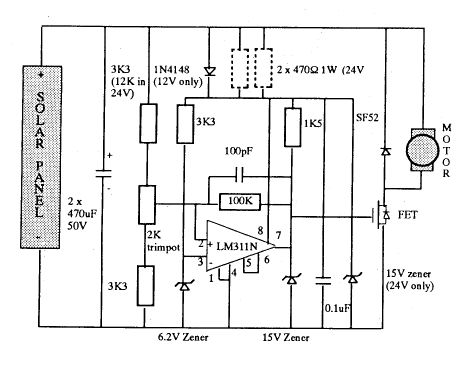
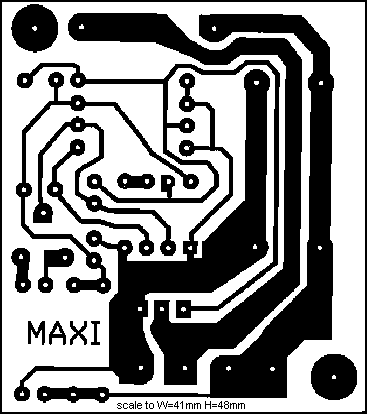
The Mini Maximiser is a simple electronics construction project. This
amazing gadget squeezes the best performance from solar photovoltaic
cells, especially in the applications of driving electric motors, air
fans and/or water pumps under conditions of partial sun or even bright
overcast conditions. Electronic hobby stores can supply the necessary
parts, and here is how to make one. It is an integral part of the DIY
solar hot water project (above), but has many other uses (see next
project!).

Prototype off-grid cooling system: Free plans for empowering
consumers with a solar powered evaporative cooler. It has the
potential to save lives during a heatwave, if market forces cannot
deliver reliability of supply to the elderly and young children during
extreme summer weather. Build your own for US$500 with these free
plans. That's for regular summer use, but if you choose to run the
unit briefly only during emergency situations, it can be operated from
an ordinary 12 volt car battery for up to twelve hours. The cost
without any photovoltaic solar panel is then reduced to around US$150.

A "heat scavenger" experiment, seemingly able to recycle 75% or more
of the waste heat down the plug hole of your daily shower

back to top


Them's fightin' words:

Basslink is an HVDC undersea electricity cable about to link Tasmania
to Australia's east coast "National Electricity Market", and has
frightening potential to increase Australia's greenhouse gas
emissions: "Basslink sucks coal out of the ground." would be fair
comment, according to this analysis.


Do power stations cause severe bushfires? Local tropospheric plumes
from power stations could be "seeding" regional forests with carbon
during wet seasons, and severely exacerbating bushfires during
subsequent el Nio droughts.

Wind energy development in Australia is about 20 years behind Europe
and the USA. Most of the coastline of the Australian continent has a
world-class wind resource, currently only being exploited in a few
scattered places. To keep abreast of recent developments, visit the
Australian Wind Energy Association's web site.

A donation to the Alternative Technology Association's Renewable
Energy Development Trust is a highly effective way to support
environmental education and sustainable development. Donations from
Australian residents are tax deductible. Simply make a cheque out to
"Renewable Energy Development Trust" and snail-mail it to Alternative
Technology Association, PO Box 2001, Lygon Street North, Brunswick
East, 3056 Australia. A special receipt will be promptly returned to
you: retain it for tax time!

A solar water heater on your roof can save up to 5,000 kg of CO2 every
year (this claim is based on fifteen years' monitoring of my own 5m2
solar water heater in suburban Melbourne, compared with a standard
"off-peak" electric water heater.)


back to top


Supply voltage affects electricity customers:

Voltage Primer: 6 min. radio interview. Audio introduction to the
supply voltage story, hear the radio interview (MP3 format or
RealAudio format) of Michael Gunter, broadcast on 5AA Adelaide 11th
August 2000. Interviewer: Leon Byner. The audio copyright holder is
Bilote Pty Ltd, whose permission to have the audio files online is
acknowledged with thanks.


Overview document on voltage, Issue Number 68 of ReNew magazine (click
here to view the cover) contains a controversial article, detailing
how increased supply voltage can substantially increase your
electricity bills.

Federal Court hands down decision on "electricity as a good"
(commodity). September 2001: Mr Justice Finn's judgement went online
at Austlii. In a nutshell, the Competition and Consumer Commission won
on the complex legal technicalities. The ESAA technical expert reports
and affidavits to the Federal Court appeared to have serious factual
errors and omissions regarding the physical properties of electricity,
and specifically the way that voltage can affect customers' power
bills was completely ingnored due to the failure to mention Ohm's Law
or its implications for consumers' energy bills. The Expert's
description of current, power and voltage was particularly
"illuminating" (!):

159. The voltage of the supply is a measure of the power which is
given up by 1 Ampere of electric current moving from the active to the
neutral conductor. [sic, double checked] The voltage is always present
while the power system is healthy.

The court case is disappointing that it has not adequately addressed
the technical issues, but at least now that the judgement has been
handed down, consumers are free to challenge the electricity industry
through the courts to recover money that has been paid in excessive
power bills. Overbilling is due to the distribution networks being
operated, whether intentionally or not, at an average voltage which
has been set at a significantly higher voltage than the product
description (240 volts, soon to be 230 volts), where the industry
demonstrably has the infrastructure to provide the correct lower
voltage if they chose to do so.

*** WARNING *** Any person who is curious about the electricity supply
voltage to their house MUST NOT attempt to measure the voltage UNLESS
they are over 18 years of age, have extensive experience and/or
qualifications to handle lethal voltages, and their mental abilities
are not impaired by fatigue, alcohol or drugs. YOU HAVE BEEN WARNED!!!

In late August 1999 the Victorian Regulator-General convened a
technical meeting between myself and two electricity distribution
businesses. My 20-minute presentation is now online here: Voltage is a
Market Issue. It shows how a three per cent increase in average supply
voltage from 240 volts to 247.5 volts could easily be costing
commercial and domestic customers in this state (Victoria, Australia)
$60 million in extra electricity alone. Then there's the cost of all
the blown light globes and appliances with a shortened lifespan....

Experimental proof: a table here shows exactly how much the running
costs of a range of home and office appliances can be increased by a
high voltage supply to your premises. Ohm's Law has not been repealed
by electricity privatisation.


back to top


Document Archive.

1.In 1987 the Victorian Wind Monitoring Study Report was published. It
seems to have had a very limited distribution. To redress this
situation, an electronic version can now be viewed here (with
important notes, containing links to wind data files).


2. New evidence against Daylight Savings Time. This data from official
Australian electricity industry sources demonstrates a significant
effect of Daylight Savings Time has in flattening the daily load
profile of electricity consumption in Victoria, Australia. The author
concludes that this plays into the hands of baseload electricity
generation companies, by facilitating their market penetration
(presently running at over 80% of market share). Baseload generators
are generally more polluting in terms of greenhouse gas emissions or
intractable nuclear fission waste, and on environmental grounds it
would be better to (i) abolish Daylight Savings Time, (ii) reduce
off-peak and night-time voltages to 230 volts to honestly reflect the
new Voltage Standard AS 60038, and (iii) slap a hefty carbon tax or
fissile waste tax on all off-peak electricity tariffs. What is the
point of having allegedly "cheap" electricity if the technology is
poisoning the planet for future generations?

3. Submission to the 1999 Australian Senate Inquiry into the adequacy
of Australia's response to global warming. Synopsis: not adequate, not
even totally inadequate, but worse!!: a bunch of greedy corporatists
being enthusiastically counter-productive!!

4.2% renewable electricity by 2010. The scheme chosen by the
Australian Greenhouse Officewill have a profound impact on the final
cost. Market distortions must be removed to allow the true value of
distributed electricity generation ("embedded generation") to be
transacted.

5.Wind farms are coming. Exciting economic prospects for Victoria wind
energy. This analysis claims that wind energy looks attractive even in
the current depressed wholesale market (NEM1).

6.Karlsson and Hill "Modelling and identification of nonlinear dynamic
loads in power systems" from IEEE Transactions on Power Systems, Vol.
9, No. 1, February 1994. A zipped, user-unfriendly hypertext/facsimile
version is available here to download and view (838kB: unzip to a
temporary folder and start with file "new-0.htm"). Wording in the
abstract, and the discussion that followed, both seemed to caution the
reader to use the information only for the purpose of "system
stability analysis". But of course, the clear demonstration of the
increased volume, and therefore cost, of electricity delivered at a
higher voltage is of vital interest to the customer. A scientific
paper should not try to restrict the uses to which the information is
put.

7.Specialist Industry Magazine Electricity Week (Australia) Volume 24,
No. 12 (317 kBytes Adobe Acrobat file). Two important voltage problems
are extensively covered in this document: the effect of high steady
state voltages on the running cost of existing appliances, and the
likely increased running cost for appliances manufactured to a
proposed new 230 volt standard. The synergistic effect of these
changes could lead to an 18% increase in running costs, unless the
regulatory authorities mandate the lowering of steady-state voltages
in line with the new 230 volt appliance rating standard.

8.The Australian Broadcasting Corporation web site has a science forum
called "Self Serve Science" where a lively debate ran for much of 1999
on what excess voltage can do to your power bill. A table of contents
(no frames) on the ABC site allows you to view a wealth of archived
material on their discussion forum.


9.Browse this document folder for a selection of other DIY energy
projects, copies of published articles, and a smorgasbord of
curiosities like: a pre-911 diatribe against US hubris by Richard
Neville: "americanpsycho.pdf".

back to top

Feedbackalways welcome.

End of page....last updated Monday, 11th December 2006.

Visit Suburbia

Friday, April 25, 2008

DIY iPhone or iPod Touch Car Dock [How To]

A crafty user at DIY web site Instructables makes a car dock for the iPhone or iPod touch from materials primarily found in your device's packaging. Throw a little bit of glue and some velcro into the mix, and you've got a clean, attractive dock for your car for virtually nothing. On the other hand, if you prefer shelling out a little cash to taking the DIY route, check out the previously posted guide to iPhone car integration.

DIY Two Dollar Laptop Stand

  • DIY Two Dollar Laptop Stand
    "Build a lightweight, sturdy laptop stand for a measly two bucks using a couple of twisted wire easels he picked up from the local dollar store and a few common household items."
  •  

    Monday, April 7, 2008

    HOW TO - Build your own solar cell

    HOW TO - Build your own solar cell

    12 กันยายน 2549, 3:59:44http://www.makezine.com/blog/archive/2006/09/how_to_build_your_own_solar_ce.html?CMP=OTC-0D6B48984890 http://www.makezine.com/blog/archive/2006/09/how_to_build_your_own_solar_ce.html?CMP=OTC-0D6B48984890

    Sol Ideas shows you how to make your own solar cell and also has a pretty spiffy looking kit - [via] - Link.

    Related:

    Solar projects, articles, how-tos and more - Link.

    [Read this article] [Comment on this article]

    Do-It-Yourself Robotics Kid & programe it via PC from MIT Lab

    PreacherTom writes "Imagine Legos and Erector Sets on crack. The fruit of a collaboration between Lego and the MIT Media Lab, the Toronto-based startup Playful Invention Company is offering the PicoCricket, "a kit of parts that can be used to build an infinite variety of robotic inventions. The kit contains an assortment of pom poms, pipe cleaners, and other craft materials reminiscent of a summer camp art period. It also includes a collection of Lego bricks and electronics: the Cricket "brain" and a motor, colored lights and a soundbox, a digital display, and an infrared beamer that allows the Cricket to communicate with a PC on which kids write the programs that control their invention's behavior. Perhaps the most important parts in the Cricket kit are the four sensors, which detect light, sound, touch, and electrical resistance. "It was lots of fun making things and controlling their action," says Grover Venkatasubramaniam (age 10). "The most fun was programming the robots. It felt like giving life to lifeless bodies.""

    http://rss.slashdot.org/~a/Slashdot/slashdot?a=3l3X1N

    --------

    Mindstorm and the Playful Invention Company hope to hook kids on the joys of creative play with robot-assembly kits

    http://rss.businessweek.com/~a/bw_rss/technology?a=cGd6Mp

    --------

    Slide Show: Crafting Toys with High Tech

    The PicoCricket Kit combines software with arts and crafts for kids to create dancing butterflies, spaghetti-twirling machines, and more

    Make an ethernet temperature monitor

    Make an ethernet temperature monitor
    13 กันยายน 2549, 5:50:41http://www.makezine.com/blog/archive/2006/09/make_an_ethernet_temperature_m.html?CMP=OTC-0D6B48984890 http://www.makezine.com/blog/archive/2006/09/make_an_ethernet_temperature_m.html?CMP=OTC-0D6B48984890
     
    Max is still kickin it, he writes - "Okay you've built the digital thermometer but you ran out of ideas and didn't know what to do with it. Well if you wanted to, you could add a Lantronix XPORT ethernet serial device to the serial channel and monitor temperature remotely over the ethernet. Now I have the ability to check temperature of my room even when i am in Hawaii or New York! The greatest thing about these little XPORTs is that you can enable any microcontroller w/ serial ports to be ethernet ready." - Link.
    [Read this article] [Comment on this article]

    Linear stepper motor controller

    Linear stepper motor controller

    11 กันยายน 2549, 22:12:12http://www.makezine.com/blog/archive/2006/09/linear_stepper_motor_controlle.html?CMP=OTC-0D6B48984890 http://www.makezine.com/blog/archive/2006/09/linear_stepper_motor_controlle.html?CMP=OTC-0D6B48984890

    James writes - "Stepper motors avoid expensive position feedback elements but cause jerking, stepped, motion. This open source, old school analog (linear) driver can be tuned for continuous motion. Ideal for telescopes, robotics, cnc, etc... " - Link.